Article
Cable management for sit/stand desks

A standing desk that lifts smoothly still fails if a short HDMI cable unplugs at full height or a power brick drags a port sideways. Cable planning is part of the mechanical setup, not a weekend aesthetic project. The desk moves; every cord that forgets that fact becomes a snag, a disconnect, or a trip line.
This guide explains a practical routing pattern for sit/stand desks used in home workstations. It is setup and safety-oriented guidance—not a product endorsement and not medical advice.
At a glance
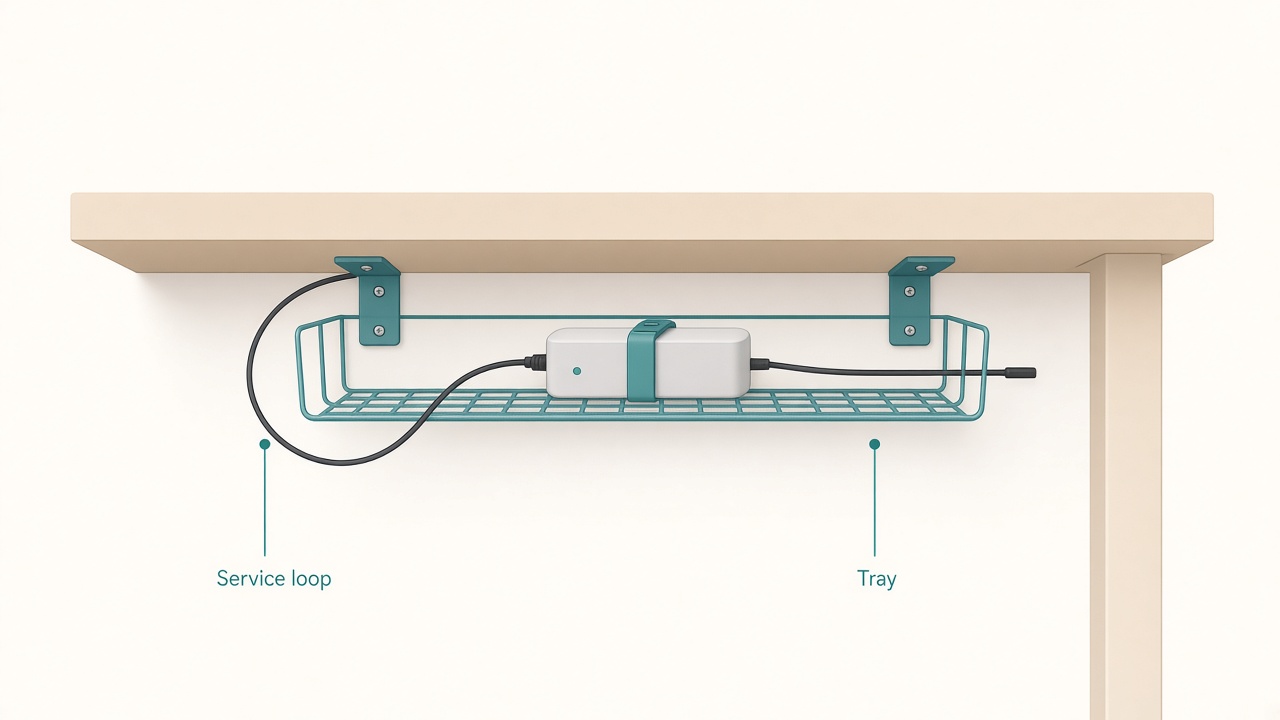
Tray plus service loop for sit/stand travel.
Start with the slack rule
Measure the vertical travel of your desk from lowest sitting height to highest standing height. Add extra slack so nothing goes taut at maximum rise, then decide where that slack will live. Uncontrolled slack on the floor becomes a caster trap; zero slack at the port becomes a yank.
A controlled loop or service loop under the desktop beats a decorative spiral that tightens over weeks. The loop should open and close as the desk moves without rubbing a sharp metal edge. If you hear a cable scrape the frame during travel, stop and reroute before the jacket wears through.
Re-measure after you add a thicker desk mat, a monitor arm, or a different laptop stand. Accessories change the path length even when the desk’s advertised travel stays the same.
Use an under-desk tray as the moving hub
Mount a shallow tray or cable spine under the desktop so the moving surface carries its own power. Park the power strip on that tray so bricks rise and fall with the desk instead of hanging from device ports. Device cables then travel only a short distance from strip to monitor, lamp, and dock.
Run one clean trunk from the tray to the wall outlet with enough slack for full travel. That trunk is the only cable that should look “long” in the room. Everything else should be short, labeled, and captive to the tray. This pattern keeps brick weight off fragile connectors and keeps the floor path predictable.
Adhesive mounts fail on textured undersides; prefer mechanical fasteners rated for the tray load when you can. Recheck screws after the first week of daily sit/stand cycles.
Identify the ports that fail first
Short laptop chargers clipped tight to a windowsill fail as soon as the desk rises. Display cables that barely reach at sitting height fail next. Daisy-chained USB hubs with no strain relief fail when a single stiff cable torques the whole chain.
Replace “exactly long enough” cords with modestly longer ones before you invent elaborate dongles. Add strain relief—a clip or tie that holds the cable jacket, not the connector shell—so movement loads the jacket instead of the solder joints. Test the full sit-to-stand range after every cable change, not only after the initial build.
If you follow a daily rotation from the standing desk schedule builder, you will discover snags quickly because travel becomes routine rather than occasional.
Separate moving cables from building cables
Building cables are the ones that should stay on the wall or floor path: the trunk to the outlet, Ethernet to a wall jack, and any bonded surge point you choose. Moving cables are everything riding with the desktop. Mixing the two—taping a monitor cord to a wall while the desk still lifts—creates a diagonal guy-wire that unplugs hardware.
Monitor arms need their own plan. Route display and power through the arm’s channel when available, then drop into the under-desk tray. Leave service loops at both the arm joint and the tray so articulation does not steal slack from sit/stand travel.
Docks work best when the dock sits on the tray or desktop and the laptop connects with a single known cable. Hot-plugging a nest of short adapters at full standing height is how ports get levered sideways.
Plan for chairs, feet, and cleaning paths
Chair casters hunt cable piles. Keep pathways clear under and behind the desk so rolling in or out of the station does not drag a snag. Soft cable sleeves on the floor are not a substitute for getting slack off the wheel line.
Feet need a clear floor plate for both sitting and standing stances. A power strip left on the floor beside the chair invites accidental kicks that reset your carefully measured slack. If the strip cannot ride the tray, mount it on a wall or desk leg within the travel budget.
Vacuuming and mopping will tug loose lines. After cleaning day, run one full height cycle before you trust the setup again.
Safety constraints you should not improvise past
Do not pinch cords in the lifting column or between moving crossbars. A cable caught in the frame can damage insulation and the desk mechanism. Keep jackets visible at frame gaps during a slow test rise so you can stop immediately if something disappears into the mechanism.
Replace frayed cables instead of taping over damaged insulation. Tape hides the problem without restoring dielectric protection. Use surge protection appropriate to your local setup, and avoid stacking heat-producing bricks in an unventilated bundle under the tray.
If the desk struggles, tilts, or makes new noises after a cable redo, remove excess weight from the tray and verify that no cord is binding the lift path before you continue daily use.
A build sequence that avoids rework
- Set sitting and standing height presets with the desktop clear of temporary clutter.
- Mount the tray or spine and install the power strip on the moving surface.
- Connect monitors, dock, and lamp to the strip with short captive cables.
- Add one trunk to the wall with measured slack for full travel.
- Label both ends of chargers and display cables.
- Cycle sit-to-stand three times while watching every moving joint.
- Fix snags, then add cable combs or ties only after motion is clean.
Aesthetic covers come last. A tidy look that conceals a taut HDMI line is a future outage.
Checklist
- Vertical travel measured; slack added for maximum height
- Service loop controlled under the desk, not piled in the caster path
- Power strip rides the desktop on a tray or spine
- Single trunk runs to the wall outlet with enough travel slack
- Display and charger cables longer than the “barely reaches” minimum
- Strain relief holds jackets, not connector shells
- No cords routed through the lifting column
- Full sit-to-stand test completed after each cable change
- Frayed cables replaced rather than taped
- Floor paths clear for chair casters and feet
FAQ
How much extra slack is enough?
Enough that nothing goes taut at maximum height, plus a small margin for mats and posture shifts. If the cable is drum-tight at full rise, it is already wrong—even if it has not unplugged yet.
Should the power strip sit on the floor for “more slack”?
Usually no. A floor strip forces device cables to span the full travel distance and invites kicks. A tray-mounted strip keeps bricks with the desk and shortens the vulnerable runs.
Do cable sleeves fix standing-desk problems?
Sleeves can neaten a finished trunk, but they do not create missing length or prevent column pinches. Solve travel and strain first; sleeve second.
What is the most common first failure after setup?
A display cable that worked while seated and disconnected on the first full rise. Test the top of travel before you call the install done.
How often should I recheck routing?
Recheck after any new monitor, dock, or mat, and after monthly cleaning. A thirty-second full-height cycle is enough when nothing new has been added.
Related tools: standing desk schedule