Article
How to set desk height without guessing
Most desk discomfort comes from a mismatch between chair height, desk height, and keyboard thickness—not from owning the wrong brand of furniture. When those three heights disagree, shoulders climb, wrists bend, and people lean into the screen to compensate. A reliable setup starts with a clear sequence: chair first when the desk moves, desk first when the surface is fixed, then a short typing test to confirm the result.
This guide is educational workstation guidance for sitting and sit/stand desks. It is not medical advice, diagnosis, or treatment. If discomfort persists or you have an existing injury, consult a qualified clinician.
At a glance
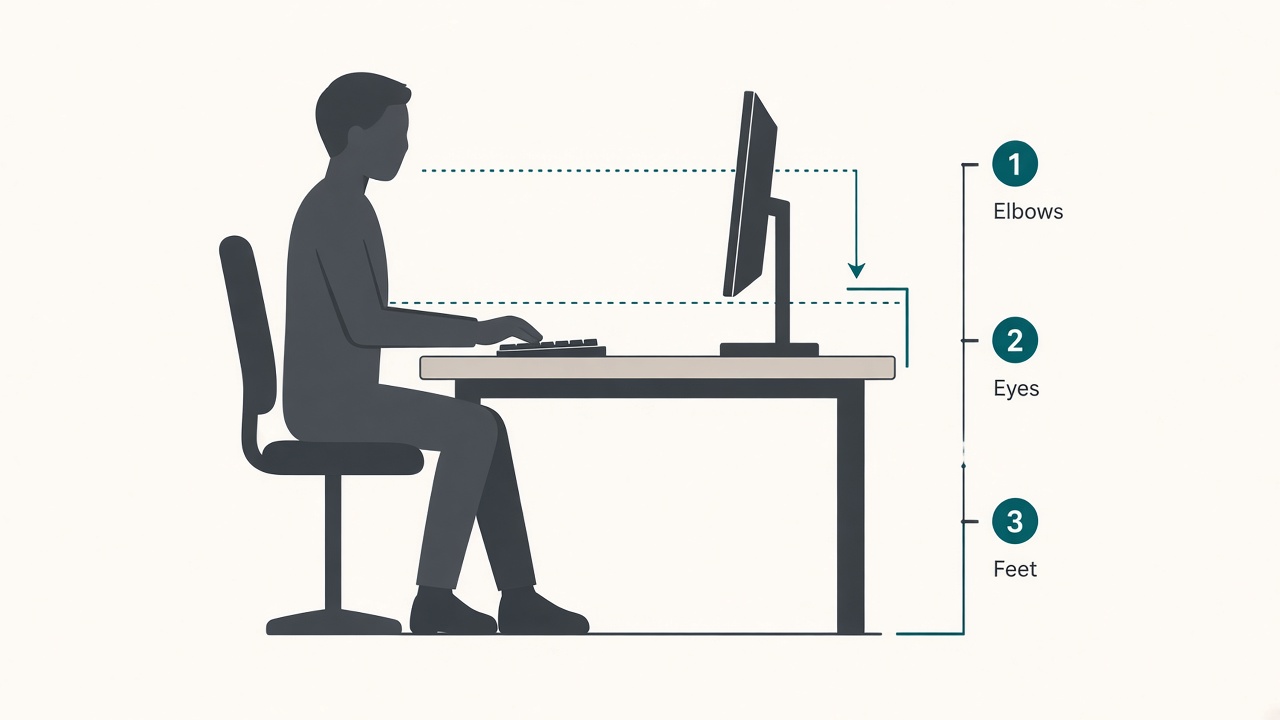
Elbows, eyes, and feet aligned before long sessions.
Start with the chair when the desk can move
Begin seated, not standing, even if you own a height-adjustable desk. Feet should rest flat on the floor or on a footrest so the lower body is stable before you touch the desktop controls. Raise or lower the seat until the knees sit roughly level with the hips and the thighs rest without hard pressure at the front edge of the cushion.
Next, relax the shoulders and bend the elbows to about 90–100 degrees with the upper arms near the torso. That elbow line is the target for the top of the keycaps, not for the underside of the desk. Raise or lower the desk until the keyboard sits near that elbow height while the forearms stay roughly parallel to the floor.
If the chair sinks after twenty minutes of work, recheck the seat height once the cushion has compressed. Many “mystery” height changes are foam settling rather than a wrong initial measurement.
Reverse the order for a fixed-height desk
A non-adjustable desk reverses the sequence. Set the desk as the fixed reference, then choose a chair height that restores the same elbow relationship. If that chair height leaves the feet dangling, add a footrest rather than dropping the seat until the elbows look right and the legs lose support.
Keyboard thickness still matters on fixed desks. A thick mechanical board on an already-high surface can push wrists into extension even when the desk edge looks reasonable. A thinner keyboard, a negative-tilt tray, or a slight desk-edge overhang for the board can restore a more neutral wrist line without replacing the entire desk.
Use the desk height calculator for a starting number based on body measurements, then refine after a real typing session rather than treating the number as final.
Sitting and standing targets use the same elbow rule
Sitting height aims for forearms roughly parallel to the floor while typing, with the mouse on the same plane as the keyboard. Standing height uses the same elbow rule while standing tall with soft knees—not locked joints and not a rigid “military” posture. The goal is a repeatable typing height, not a pose held for its own sake.
When you raise a sit/stand desk, recheck the keyboard and mouse after the surface arrives at standing height. Mats, thicker shoes, and a different stance can change the effective elbow line even if the desk memory preset is correct. Save labeled presets for sit and stand only after both postures pass a short typing test.
If you alternate frequently, treat each transition as a mini audit: elbows, wrists, and whether you are reaching forward for the keyboard. A schedule can help you practice the swap without turning standing into an all-day endurance trial; keep geometry as the constraint, not minutes on a timer alone.
Fine-tuning signals after a real work sample
Shoulders that climb toward the ears usually mean the desk is too high or the chair is too low. Lower the surface or raise the seat until the shoulders can stay quiet while you type. Do not “relax harder” on top of a geometry error.
Wrists that bend upward sharply usually mean the keyboard is too high relative to the elbows, or the board is thick without enough negative tilt. Bring the keycaps closer to elbow height before buying accessories as a first response. Reaching forward to type usually means the keyboard sits too far away or the monitor has pulled the whole setup toward the rear edge of the desk; bring the keyboard closer and keep the mouse at the same height beside it.
Run a thirty-minute sample of real work after each major change. Fidgeting in the first two minutes can be novelty; shoulder hiking at minute twenty is useful feedback. Adjust one variable at a time so you know which change helped.
Monitor height follows desk height, not the reverse
People often raise a monitor to “fix” discomfort that started at the keyboard. Fix input height first. Once the keyboard and mouse sit correctly, place the monitor so you can view the primary text without permanently craning the neck or hunching toward a low laptop screen.
If the laptop is the display, raise it on a stand and use an external keyboard and mouse at desk height. Typing on a raised laptop returns you to the original mismatch: display height wins, elbow height loses. External input devices are what make a riser viable for full work sessions.
Common mistakes that recreate the mismatch
Copying a friend’s desk height from a photo fails because body proportions, shoe soles, cushion compression, and keyboard style all change the real target. Measure elbows in the posture you actually use for work.
Centering a full-size keyboard by its outer frame often pushes the mouse too far right and loads the shoulder, which then gets blamed on desk height alone. Center the main alphanumeric block to the body midline, then place the mouse immediately beside it at matching height.
Standing all day on a new desk without soft knees or a mat can create new fatigue that people misread as “wrong height.” Short standing blocks with the correct elbow line beat heroic all-day standing at a guessed number. Recheck cable slack when the desk rises so a taut cord does not yank the keyboard out of position and undo your setup.
A short calibration sequence you can reuse
Use this sequence whenever you change chairs, keyboards, shoes, or desk presets:
- Feet supported; seat height set so knees are roughly level with hips.
- Shoulders relaxed; elbows bent about 90–100 degrees.
- Desk or keyboard height matched to that elbow line.
- Mouse placed beside the keyboard on the same plane.
- Monitor adjusted only after input height feels stable.
- Thirty-minute real-work test; adjust one signal at a time.
Write your sitting and standing heights on a card if the desk lacks memory presets. Future you will not remember millimeter guesses after a weekend away.
Checklist
- Feet supported on floor or footrest
- Seat height set with knees roughly level with hips
- Elbows near 90–100 degrees with relaxed shoulders
- Keyboard near elbow height; forearms roughly parallel to floor
- Mouse at the same height and immediately beside the keyboard
- Fixed desks paired with chair and footrest adjustments as needed
- Standing preset rechecked with soft knees and real typing
- Monitor adjusted after input height, not before
- Thirty-minute work sample completed after changes
- Sit and stand heights recorded or saved to presets
FAQ
Should desk height match my elbow exactly to the millimeter?
Close is enough. Aim for relaxed shoulders and roughly parallel forearms, then refine after typing. Obsessive millimeter chasing usually matters less than consistent daily posture and a matched mouse height.
What if my desk cannot move and my chair is already at maximum height?
Lower the effective typing surface with a thinner keyboard or a negative-tilt tray if available, and use a footrest if raising the chair further would leave feet unsupported. If none of those options work, a lower aftermarket desk surface or a keyboard tray is the practical path.
Do I need different heights for mouse-heavy versus keyboard-heavy work?
Keep both devices on the same plane. If one task uses a pointing device more, prioritize placing that device immediately beside the keyboard rather than creating a second height platform.
How often should I recalibrate?
Recheck after any chair change, new keyboard, thick-soled shoes for standing work, or desk move. Otherwise a brief monthly check during a workspace reset is enough for most people.
Can the calculator replace a typing test?
No. The desk height calculator gives a sensible starting point. Your elbows, keyboard thickness, and a real work sample decide the final setting.
Related tools: desk height